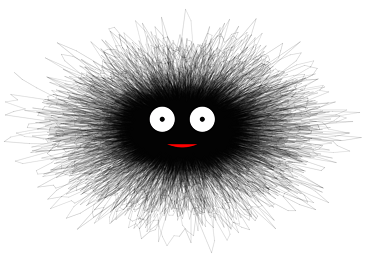
I fell into a discussion with another soccer-dad last weekend as we watched our own children play indoor soccer about teaching kids to code. I talked about my experiences with Raspberry Pi, Scratch and Sonic Pi at the coding club we set up at my son’s school, and I mentioned that after reading Generative Art several years ago I pair-programmed some happy faces with my then-seven-year-old son in Processing:
Heh, memories. :)
He replied that his daughter was involved in dance, and he’d seen that some people use Processing for stage productions and they incorporate them into live performances via Isadora. A little post-discussion Googling led me to some fascinating projects involving motion-detection and computer-generated art.
I don’t have much experience in graphics but I wanted to try this out with Microsoft’s Kinect and Processing, with the idea that maybe I could incorporate it into a team programming project for kids later on. I took several wrong turns before I got this working, so here are some directions down the “happy path” for anyone else wants to give it a try.
I’ll post later on how to manipulate some Kinect data with this setup.
Requirements
- Windows 10
- Processing 3.2.3 64-bit
- Kinect for XBox One V2 (I have model 1520)
- Kinect Adapter
- Kinect SDK 2.0
There are several versions of the Kinect, and I’ve only tried the second generation Kinect (aka “V2”). There was once a Kinect V2 for Windows as well as a Kinect V2 for XBox One, but the Windows version was discontinued in favour of using the XBox One version with an adapter—they realized there was no point in supporting two products. Both will work, but I’m using the standalone XBox One Kinect.
The adapter’s description says that it’s for the XBox One S, but it works fine to connect it to a Windows machine via USB-3. I’ve read that the adapter works with a Mac, but I haven’t verified that.
Installation
- Download the Kinect SDK 2.0 and install it. This has some programming libraries as well as a program called Kinect Studio that you can use to try out the Kinect. (The processing library we install below requires it.)
- Set up the Kinect and attach it to the computer, then verify that it’s working with Kinect Studio.
- Download and install the 64-bit version of Processing. Download
the zip file and uncompress it somewhere, e.g.
C:\Program Files\Processing - Launch the program from the
processing.exeexecutable, and from theSketch -> Import Library... -> Add Librarymenu item, type “kinect” in the search box and choose “Kinect V2 for Processing”. Click “Install”—I have version 0.7.8.
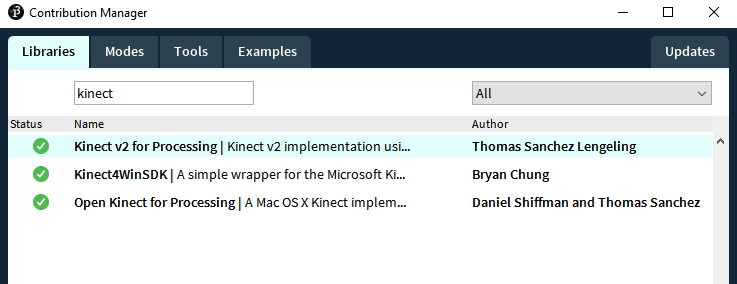
I had first tried the Open Kinect for Processing library, but it seems to have several problems, and I couldn’t get it working on either the 32 or 64 bit version. This is too bad because the video introduction is pretty good. I didn’t try Kinect4WinSDK, because it hasn’t been modified in several years.
Code
Open up Processing, copy-and-paste the following code in the window, and click the “Run” icon:
// Adapted from https://github.com/ThomasLengeling/KinectPV2/blob/master/KinectPV2/examples/PointCloudDepth/PointCloudDepth.pde

KinectPV2 kinect;

int maxD = 4500; // 4.5m
int minD = 0;  //  50cm

void setup() {
  size(1024, 424, P3D);

  kinect = new KinectPV2(this);
  kinect.enableDepthImg(true);
  kinect.enablePointCloud(true);
  kinect.init();
}

void draw() {
  background(0);
  image(kinect.getDepthImage(), 0, 0);
  image(kinect.getPointCloudDepthImage(), 512, 0);

  kinect.setLowThresholdPC(minD);
  kinect.setHighThresholdPC(maxD);
}
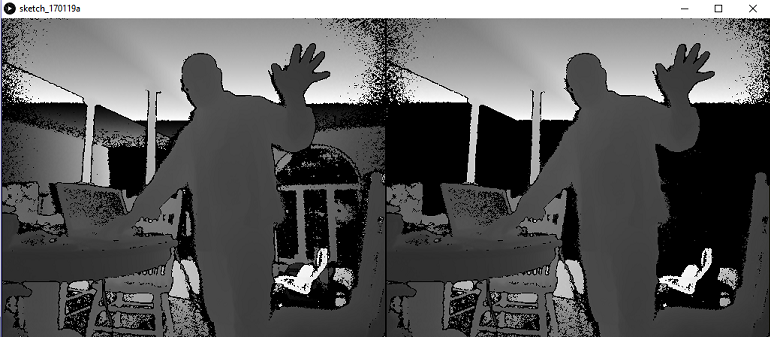
If everything went well, you should see a depth map image and a point cloud image side-by-side like the following:
In the next part of this series I’ll describe how to use data that comes in from the Kinect to do something interesting. In the meantime, have a look at the KinectPV2 documentation on github.