So far in this set of blog posts we’ve created a simple python microservice using flask, added user input validation and then dockerized the result. In Part 4 we’ll set up a Kubernetes Cluster on Azure Kubernetes Service so that we can deploy a preliminary version of the app.
Code for this can be found on GitHub. Or you can use this template as a starting point.
Create a Kubernetes Cluster
A cluster is a group of machines that runs containerized applications. If you have an
Azure account, you can launch an AKS cluster in the Azure Portal. Click on
‘Add’ to create a new Kubernetes Cluster and create a new Resource Group (e.g. KubernetesDemo) to put
it in.
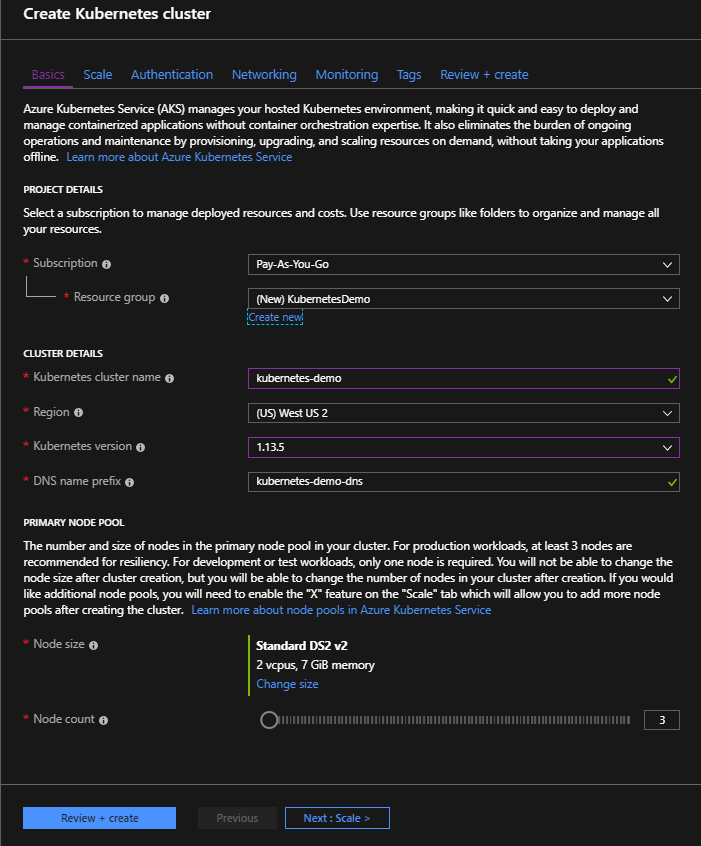
Make sure “RBAC” is turned on under “Authentication”—Role-Based Access will be important later on. In the meantime, all the other defaults should be OK. Click on “Review and Create”,
When creating a cluster in the Portal, you may want to use a simple, human-readable name for the “kubernetes cluster name” like “production”, “staging”, “operations”, etc., since that’s what you’ll be typing from the command line.
Click on “Create”. Azure will take a few minutes to create your cluster.
When you create a “real” cluster later, you will probably want to create a service principal separately with a long expiry time. The “default service principal” that is auto-created here will expire after a year, which may give your future self an unpleasant surprise 365 days from now.
Install the Kubernetes Tools
While you’re waiting for the cluster to start up, you can go ahead and install the Azure and Kubernetes command line tools:
- the Azure command-line tool
az - The Kubernetes command-line tool
kubectl
You can log in to azure using the az tool. This will cache your AKS (Azure Kubernetes
Service) credentials for the “demo” cluster on Kubernetes on your local machine:
az login
az aks get-credentials --resource-group KubernetesDemo --name demo
Create a Docker Registry
You will need a place to store your docker images so that your cluster can find them. The main registry for containers is Docker Hub, but here we’ll create our own private Container Registry on Azure instead.
From the Azure Portal find
“Container Registries” and create a new one—we’ll call ours mydemoregistry, and put it in a new resource group
ContainerRegistryDemo. The registry name must be globally unique, as it creates a url
at mydemoregistry.azurecr.io that you’ll use later to access your registry. So you’ll have
to give yours a different name.
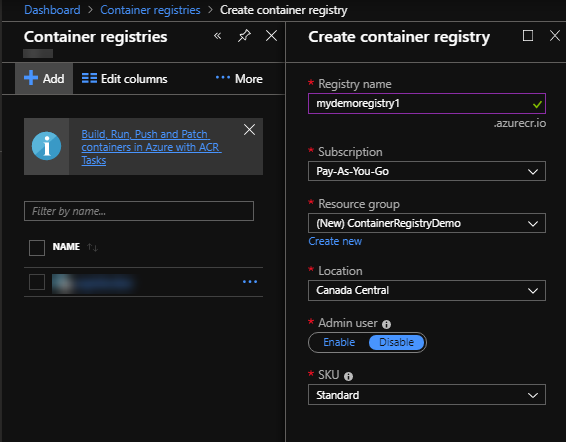
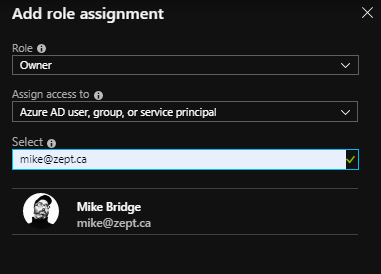
The defaults Azure gives you should be fine—click on “Create” and wait for the registry to be created. Once it’s created, click on “Access Control (IAM) -> Role Assignments”. You’ll need to make sure your login has access if it doesn’t already:
Log Into the Docker Registry
This will log you in to your newly-created Azure Container registry:
az acr login --name mydemoregistry
Now we can take the dockerized Flask image we created from part 3, tag it
and push it to the registry. We called our original image pythondemo, but in order to push it to
the right place we need to give it a new repository name.
docker tag pythondemo mydemoregistry.azurecr.io/pythondemo:0.0.1
The 0.0.1 tag that appears after the colon is optional, but we’ll include it so we
can keep track of hypothetical versions. (Another tagging best-practice is to tag each
commit with the first few characters of the git commit SHA).
We should now be able to push our container to the registry:
docker push mydemoregistry.azurecr.io/pythondemo:0.0.1
Don’t worry if this takes a long time. You probably noticed that it’s pushing several different things in parallel—those are docker layers, and fortunately most of those layers will remain the same as you modify your app over time. That means that future pushes will only incrementally send the layers that contain your changes, and the main Docker layers like the large Ubuntu distribution will already be there.
We’re almost ready to deploy this thing—we just need to give our cluster permission to access
the container registry. (If you notice an error later in kubectl logs that says trying and failing to pull image, this
is probably the reason.) This script to set the permissions is from docs.microsoft.com
and adapted here from bash to PowerShell (!):
# PowerShell
$AKS_RESOURCE_GROUP="KubernetesDemo"
$AKS_CLUSTER_NAME="demo"
$ACR_RESOURCE_GROUP="ContainerRegistryDemo"
$ACR_NAME="mydemoregistry"

# Get the id of the service principal configured for AKS
$CLIENT_ID=(az aks show --resource-group $AKS_RESOURCE_GROUP --name $AKS_CLUSTER_NAME --query "servicePrincipalProfile.clientId" --output tsv)

# Get the ACR registry resource id
$ACR_ID=(az acr show --name $ACR_NAME --resource-group $ACR_RESOURCE_GROUP --query "id" --output tsv)

# Create Role Assignment
az role assignment create --assignee $CLIENT_ID --role Reader --scope $ACR_ID
If you prefer, you could also use the “Add Role assignment” dialogue in the Portal to assign “Reader” permissions to the Demo-cluster security principal that we created when we created the cluster.
Deploy
Kubernetes deployments are usually done with YML files. We’ll need to create a simple one to get our
flask app online:
# deploy-demo.yml
apiVersion: apps/v1
kind: Deployment
metadata:
  name: demo-python-flask-deployment
spec:
  selector:
    matchLabels:
      app: demo-python-flask
  template:
    metadata:
      labels:
        app: demo-python-flask
    spec:
      containers:
        - name: demo-python-flask
          image: mydemoregistry.azurecr.io/pythondemo:0.0.1
          imagePullPolicy: Always
          env:
            - name: FLASK_ENV
              value: "development"
          ports:
            - containerPort: 80
---
apiVersion: v1
kind: Service
metadata:
  name: pythondemo-flask-service
spec:
  selector:
    app: demo-python-flask
  type: LoadBalancer
  # uncomment this if you have preallocated a static IP address:
  # loadBalancerIP: a.b.c.d
  ports:
    - protocol: TCP
      port: 80
      targetPort: 80
  loadBalancerSourceRanges:
    # replace e.f.g.h with your public IP address: https://www.whatismyip.com/
    # to limit access via the firewall to your network's public ip address.
    - e.f.g.h/32
This is divided into two sections—a Deployment and a Service. In Kubernetes, a deployment is a description of how to roll out pods that will run your containers. A service is a description of how your pods will be accessible
Deployment
Our deployment defines a selector that it will use to figure out which pods belong to it—in
this case it’s app = demo-python-flask. We’ll pull the docker image mydemoregistry.azurecr.io/pythondemo:0.0.1 from
our registry, set an environment variable, and open up port 80.
Service
If we were to deploy this without an accompanying service, our flask serice would be available to other pods within in our cluster on port 80. But our goal here is to make our app available to the rest of the internet. To do that, we’ll tell Kubernetes to provision an IP address and publish our service to the internet behind a load balancer.
We could specify a particular static IP address by explicitly setting a loadBalancerIP, but in this demo
we will let Azure assign one for us.
The service also uses the same selector app=demo-python-flask to find pods to publish.
We’ll publish this service with the name “pythondemo-flask-service” so we can
refer to it later in the command line via kubectl.
Since we aren’t really ready to let just anyone use our service, we’ll configure the firewall
to limit access to our own IP address—so you should replace e.f.g.h with your own
ip4 address before you deploy the service.
Ship It!
kubectl apply -f ./deploy-demo.yml
Let’s see where Kubernetes deployed our app:
> kubectl get service pythondemo-flask-service
NAME                       TYPE           CLUSTER-IP    EXTERNAL-IP     PORT(S)        AGE
pythondemo-flask-service   LoadBalancer   10.0.16.114   93.184.216.34   80:32746/TCP   1m
If you type this before the machine is available, you’ll see “pending” under EXTERNAL-IP. But we waited enough time, so we can now browse to our service at http://93.184.216.34. (Note that it may take a few moments before it becomes fully available.)
{
  "message": "It Works"
}
Before we shut things down, let’s take a quick tour of kubectl in Part 5.